
Put on a Happy Face!
 Or a sad face, a funny face, an ugly face, or a scary face! One of the purposes of wearing a mask is to disguise or hide one's identity. Halloween is a holiday celebrated in some parts of the world on October 31st. Children dress in costumes and masks, attend parties, and march in parades to show off their outfits. Everyone has a good time trying to guess who is behind the mask!
Another purpose of wearing a mask is to protect the face. Some of these include masks worn by baseball catchers, hockey players, firemen, scuba divers, and doctors. Probably the most widespread use of masks, however, is wearing them for entertainment, ceremonies, and rituals. Since ancient times, people all over the world have worn masks for this purpose, and in some societies, masks are thought to have spiritual powers. They are an important part of theatre in Japan. Dating from the 14th century, the Noh mask is still used today in performances.
Just as with folk art, people make masks with many different types of materials, and they use whatever is available to them. Clay and papier mache are commonly used, but many are carved of wood. Most Noh masks, for example, are made of Japanese cypress. The Huichol people of Mexico create beautiful masks by embedding beads in a beeswax layer over carved wood.
Making masks is fun, and it is a good way to recycle materials. Besides the ones suggested for this activity, look around your house for other supplies to see what you can use to decorate your mask and help save landfill space. Good places to look include sewing boxes or yarn baskets. Perhaps an adult will help you look in drawers or closets for other materials that are just taking up space and eventually will go to the landfill anyway.
You will need:
|
How to: The paper you work with is flat, but by cutting it and using special art techniques, you can make it fit your face and decorate it so that the mask is three-dimensional. Working with paper this way is called paper sculpture.
Before you start, decide what character you want to make. Will it be a person, an animal, an alien from outer space? Letting your imagination go will help you choose a character, and you will be free to decorate the mask any way YOU want to.
This will also enable you to choose any color you wish for the background or base of the mask. Choose a 9"x12" piece of paper for the form or base. Fold the paper in half width-wise so that it now measures 6"x9". Open the paper and lay it flat.
Place your ruler on the crease, measure 4" over from the left edge, and mark this with your pencil. Now repeat this step for the other side, measuring over 4" from the right and making a mark.
Cut on the fold lines up to your marks. Now your paper is connected by a one inch space in between. Cutting the paper in this way will allow you to move or slide the top part on each side over the bottom area. The more you slide the top over, the more pointed the nose will become. Experiment with the base, and decide how three-dimensional you want the mask to be.
As you can see, a triangular area is formed where the top overlaps the bottom when you make the base. One side at a time, glue the mask by spreading a small amount of glue in this area on the bottom half. Slide the top over the bottom and hold the two together till they are fastened. If you would like to make a more defined chin , make a two or three inch vertical cut in the bottom center. As before, spread glue in a triangular shape on one side and slide the other over to fasten.
With this form or base completed, you are ready to shape the face of your character. Using the pencil, round one side of the top by drawing a short curved line connecting the top to the side and cutting on this line. Turn this piece over, and using it as a pattern, trace it to make the other side. Cut it off. Repeat these steps to shape the bottom of the mask. You may, however, want to make the lower part of the face narrower.
To make the eyeholes, put on the mask and carefully mark these areas. Make an eye shape pattern on a scrap of paper. Lay the mask in front of you and trace the pattern. If the eye shape is asymmetrical, be sure to turn the pattern over when drawing the other eye. Cut out the eye with your scissors by carefully poking the point of one blade into the center. Then cut out the eye shape.
Now the real fun begins! With the mask form completed, you are ready to add the facial features and details with scraps of construction paper. You have learned how to take a flat piece of paper, cut it, glue it, and pop it up to make a base for your sculpture. But there are many other ways to work with paper. How you use the following methods to develop your mask's character will be up to you!
Paper Sculpture Techniques:
Most of these paper shapes, such as fringing and curling, can be glued flat against the mask. Gluing a scored piece, cylinder, or a cone will be more of a challenge, however. They must be glued on edge as you learned to do in the Mat Board Sculpture project. Just be patient, and hold the shape till it stays in place. Remember, white glue is nearly invisible when it has dried.
Fringing: Make successive cuts all across a scrap of paper. The size and shape of the paper is determined by what purpose it will serve, but this is a good one for beards, mustaches, and hair. Layer fringed pieces to add interest and bulk.
Curling: Wrap a long strip of paper around a pencil, or curl the paper by winding it around your finger. If you are careful, you can curl paper by using scissors. Hold the paper in one hand and the scissors in the other. Open the scissors wide, and place one blade on top of the paper. Hold the scissors with your thumb on top and place your forefinger underneath. Draw the blade away from you several times. This method is also good for making hair.
Pleating: Fold a scrap back and forth in an accordion pleat till you come to the end of the paper. Make a fan shape by gluing one end. Use this for decorative trim or earrings.
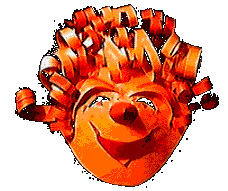
Scoring: Open your scissors wide and use one blade like a knife by drawing or pulling it across the paper in a straight line or an arc. Since paper has a grain, scoring helps to make the paper bend easier. Scoring was used on the eyebrows and mouth of the clown example shown here.
Spiral: Starting on the outside edge of a circle, make a small cut into the shape. Then cut around and around slowly moving into the center. This may be done with other shapes, such as rectangles and triangles, too. Just be sure the direction of the cutting lines follow the shape of the object. When you're done, extend the shape by pulling out on the center. Glue eye balls on these or use lots of smaller ones for curly hair.
Chains: Glue a short strip of paper into a circle. Put another strip through the circle and glue it to itself. Continue adding strips and gluing till you make the chain as long as needed. Small chains may be used for necklaces or parts of earrings.
Ball: At the start, the pattern formed from this method will look like spokes on a wheel. Start with four strips of paper, all the same size. Lay a strip of paper in front of you, and glue another strip in the center at a right angle to it. Glue another strip in the center in between these. Glue the last strip in the center in the remaining space. Turn the whole shape over, and bring the bottom strip up, gluing it to itself. Continue the process till all the strips are glued to form a ball. Use this for a clown's nose or make small ones for drop earrings. "Mash" the ball and glue it shut to form a flower shape.
Cylinder: Start with a square or rectangular scrap of paper. Roll it into a cylinder and glue it shut. Use for decorative trim or a nose.
Cone: Use a compass to draw a half circle on a scrap of paper. Cut it out, and, holding the shape with the straight side up, curve the ends toward yourself and over each other to form the cone. Make the cone smaller by wrapping it tighter. When you decide how big you want the shape to be, glue it shut. Longer cones can be made by starting with bigger semi-circles. Cones can be used for horns and they make good noses, such as the one shown on our clown example.
Tips and Tricks:
Rather than wearing your mask, hang it as Halloween decoration. If you prefer to wear it, however, have someone help you mark the sides so you can attach yarn or strings. Reinforce it on the inside to keep it from tearing.
Besides using scraps of construction paper, look around your house for other materials with which to decorate your mask. Scraps of gift wrap, fabric, raffia, yarn, and buttons are a few of the things you can use. Remember, what you work with is not as important as what you do with it. Use your imagination!
You can use paper sculpture techniques to make other things, such as party favors or decorations, for Halloween. The methods described here are just some of the ways you can work with paper to make it three-dimensional, however. Ask your librarian to help you find books on the subject. In the meantime, enjoy your mask and have a Happy Halloween!
© 1997 Marilyn J. Brackney. Used with permission.
More about The Imagination Factory:
The Imagination Factory shows visitors how to reuse and recycle solid waste to make art. Created by artist and teacher Marilyn J. Brackney, the award-winning site is listed by the American Library Association as one of the best online resources for kids. Since its launch in 1996, millions of people have visited, looking for inexpensive art lessons or ways to encourage kids to reduce, reuse, and recycle.
Featuring dozens of free, art/reuse activities, The Imagination Factory includes lessons in drawing, painting, sculpture, collage, paper mache, marbling, and crafts. A Trash Matcher links visitors with appropriate art activities that use the solid waste they have available, and a feature called The Badge Matcher allows Brownies and Girl Scouts to quickly locate projects that help satisfy badge requirements.